Saturday, 14 December 2013

Little Planets

After taking a look at Chris Kotsiopoulos' work, I've become quite interested in the 'little planet' technique he's used on a few images. His work often combines multiple techniques such as timelapse photography to create really interesting little planets.

Here's a tutorial covering the basics of how it's done:

http://content.photojojo.com/tutorials/create-your-own-panorama-planets/

Here's a collection of these I've found so far.


The problem with this technique is that it's quite overdone now and unless you can bring something interesting to the image like these images shot from the peak district.

Ideally other techniques are incorportated like in this image by Chris Kotsiopoulos:


This image shoes a full 24 hours in a brilliant way. His website actually contains a brief explanation of how he created this image. I think attempting to create something on this level would be too ambitious for my current skills. It would also require transportation and equipment that I don't have access to. Perhaps I'll look into 180 degree panoramas instead and incorporate a timelapse in there.


Friday, 13 December 2013

Sabrina Bridge Idea

From my ideas my favourite is a 180 degree panorama on the middle of Sabrina Bridge. This drawing illustrates the direction of my idea. If I'm to create a 180 degree panorama it'd be useful to shoot one photos for every 10 degrees, resulting in 18 photos to stitch. I think this would be enough overlap to ensure Photoshop can stitch the photos regardless of the lens distortion.


Before I go ahead an do this, I'll do some test shots to see how well the 180 degree panorama works with a 10-20mm lens.

Wednesday, 11 December 2013

Location hunting - Points of Interest

Now that I've got used to using the equipment and have a few ideas of what I'd like to create it's time to think about the locations I have available. Unfortunately I'm not as free as I'd like to be here because I don't have a car. Ideally I'd be able to do a lot of travelling just to figure out some interesting places to go to. The Malvern Hills would be particularly interesting I think and it would be a great place to do some star trail/night sky photography. 

Here are some ideas I came up with while keeping in mind the limitations I face such as limited travel methods (walk, cycle or bus) and money for things like extra batteries/intervalometer.


Cathedral:

I'd like to do some wide angle panoramas inside the Worcester Cathedral but I think that considering the time of year, it's unlikely I'll get a clear enough day to ensure consistent lighting between each shot. Too many clouds!

The outside of the building is very interesting too though and is lit up at night. I think there is some potential for interesting landscape shots showing the vast scale of the building. Perhaps I could try a timelapse of this but I imagine the shots where the lights come on won't stitch well with the previous shots.

Great Malvern:

I'd really like to travel to Great Malvern to take some photos inspired by Chris Kotsiopolous' work. It'd be a great place to do some star trails or nightscapes but without my own car I think this idea is probably going to be impractical. 

Town Hall:

A few months ago I was in the Guildhall when there was a music sale on. I took the opportunity to have a browse around the building and on the top floor there's the main event room. It's a very large room featuring big framed paintings and grande chandeliers. Thinking back, this might be an interesting room to create a 360 degree panorama in. There do seem to be quite a few images like this around now though and I think it's unlikely I'd be allowed permission to use the room.

County Cricket Club:

One place that has come to mind is the county cricket club. There is a little building on the field that looks a little out of place. At night time it's often lit up which contrasts with the dark field it's in. Last winter the field was very flooded which made the building look even more out of place, it actually had a horror film-set kind of feel to it. It would be very cool to have someone travel across the scene in a canoe with an oil lamp, achieving a creepy silhouette effect. 

Sabrina Bridge/Road Bridge:

I'm particularlly interested in shooting around the Sabrina bridge due to the river. Chris Kotsiopoulos' work often focuses on the sky, natural elements and extreme weather. If the river floods like it usually does, I think I could get some quite interesting images down there. One Idea I'm currently thinking of is to shoot a 180 degree panorama whilst standing on the middle of the bridge, so that both sides of the river captured. I would frame this so that the sky and the reflection in the water balance the image out, with the river as the vanishing points on both sides. 

I think that this image would encapsulate many memories for me because this bridge is probably the place I've been to the most in Worcester as it's needed when I'm walking to most places. My thinking is that by the time I come to shooting the final images the river level should be quite high which will make the image more interesting than usual. I will go and do some test shots asap.

Wednesday, 4 December 2013

Panorama tests

Today I thought I'd have a go at the vertical panorama in the cemetery with the 10-20mm lens. The light was great when I set off but by the time I'd set up the sun had dropped behind the trees a bit. I wanted to shoot this facing the other direction but this way the sun way right behind me creating some pretty nice lighting for the path. Next time I'll make sure to give myself time to set up and find the best angles. It was also difficult because it's a fairly busy path between 3-4 mainly due to school children. 


This was the best one I came up with, there some slightly blurring in some shots because the tripod I was using is too flimsy and light weight but I think I achieved a pretty good sense of depth here.

After the light faded here I went for a walk to try and find higher ground to try and get a few pictures of the sunset because it was really golden today. I don't know the area all that well so I didn't find much. Walking back I noticed the sky was a really nice colour so despite there not being much to take a photo of I thought I'd try and capture these colours.

Shooting handheld got a little difficult due to the low light.


Here I was trying to capture a panorama at the corner to create an exaggerated sense of depth that leads the eye towards the sunset. The moon is also visible in this shot but its at the waxing crescent stage so it's pretty small and difficult to see. The light transition was really nice here but it was a little too dark. I'd liked to have used a tripod here to get crisp shots but the best angle was in the middle of the road and it was far too busy.


The lighting during sunset definitely makes for much more interesting photos, next time I'll plan to visit more interesting locations.

I tried to get some moon shots from my bedroom window after I got back but the tripod wasn't tall enough and it soon disappeared behind the roof of the house across the street. I'll attempt some more moon photography when it reaches at least quarter moon.

Tuesday, 3 December 2013

Golden Hours

Professional photographers swear by the "golden hour" as the time of day with the best lighting. Discover what it is and how to take advantage of it.

If there's one thing that can make or break a photograph more than any other, it's lighting. You might have the most incredible landscape or stunning portrait model, but without the right quality of light you can still be left with a flat, dull, and uninspiring photo.

This is particularly true in outdoor photography - it can often be difficult or impossible to use artificial lighting to illuminate your subject, so you're completely reliant on the natural light.

As a result, it's critical to find the right time of day to shoot your outdoor scene. Thankfully, professional and amateur photographers have been thinking about this problem since the invention of the first camera, and have found the perfect solution - the so-called "golden hour"
.

What is the Golden Hour?

The golden hour, sometimes called the "magic hour", is roughly the first hour of light after sunrise, and the last hour of light before sunset, although the exact duration varies between seasons. During these times the sun is low in the sky, producing a soft, diffused light which is much more flattering than the harsh midday sun that so many of us are used to shooting in.

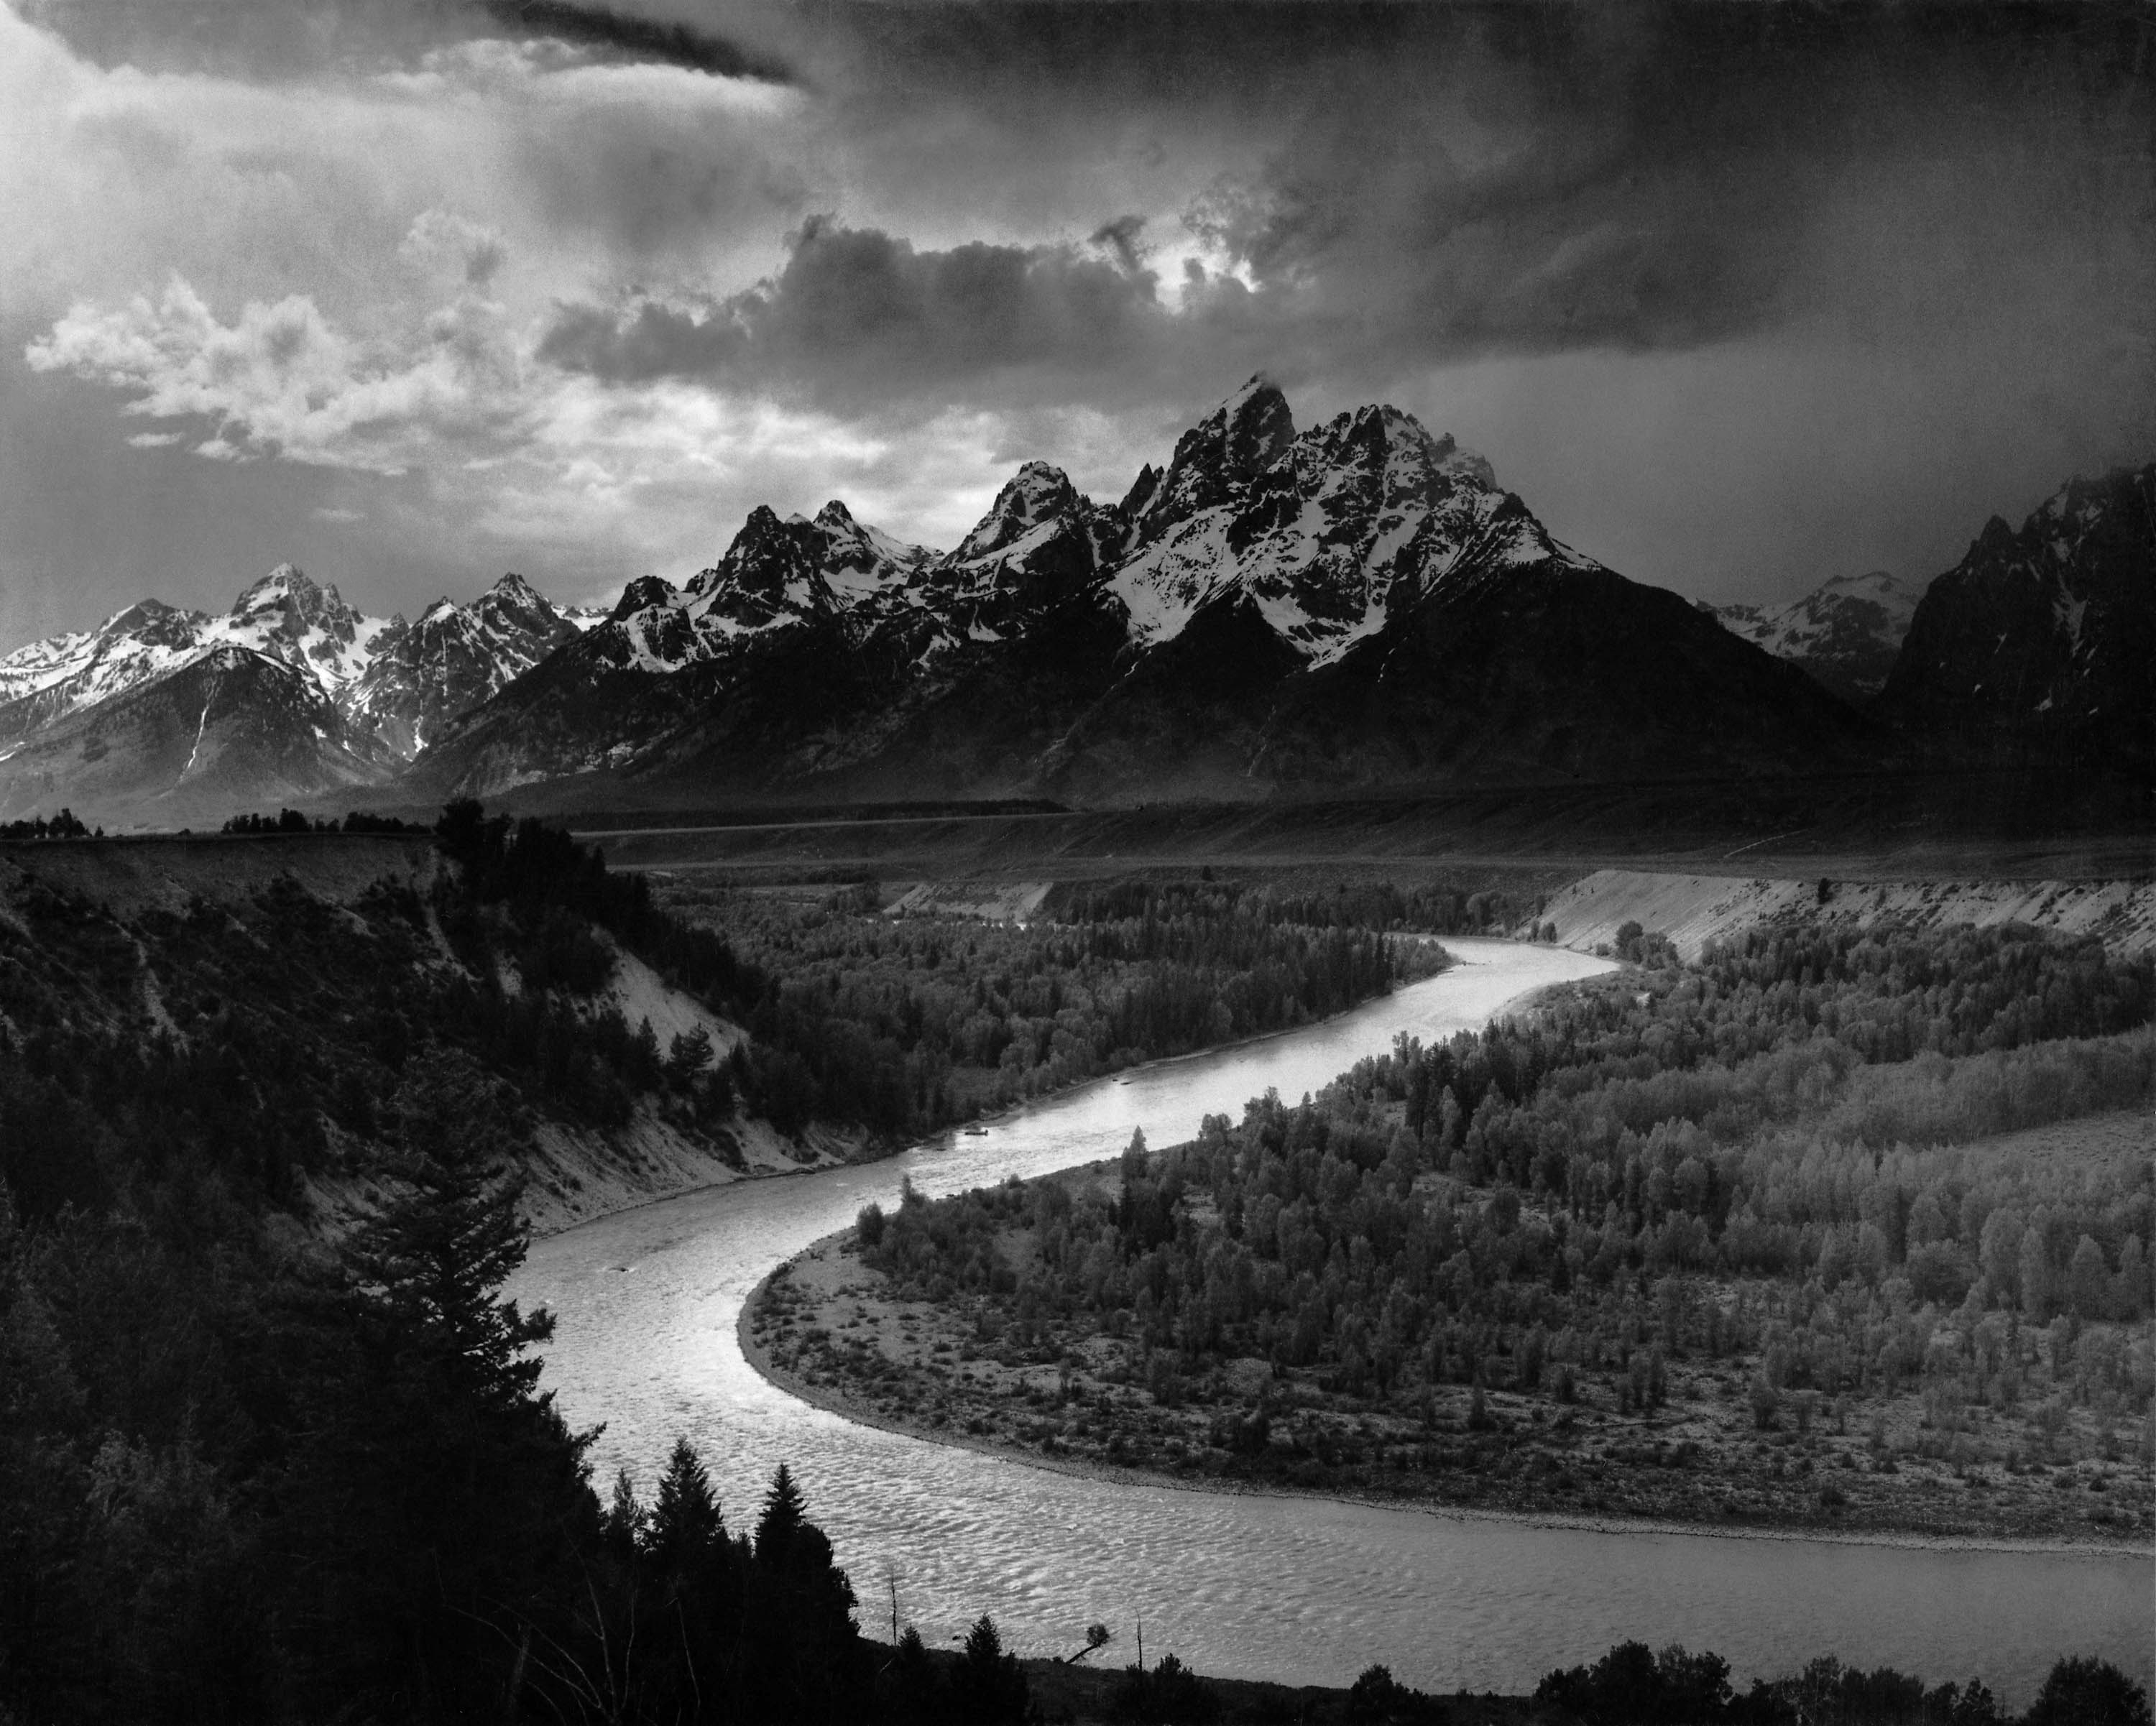
Lighting during the golden hour is soft, diffused, and warm. Image by Martin Sojka.

by Mark Hamblin

The light of dawn is special. At first it’s a cool blue as darkness retreats to reveal a new day. Then, oddly, as sunrise is imminent, the light is flat and almost colourless.

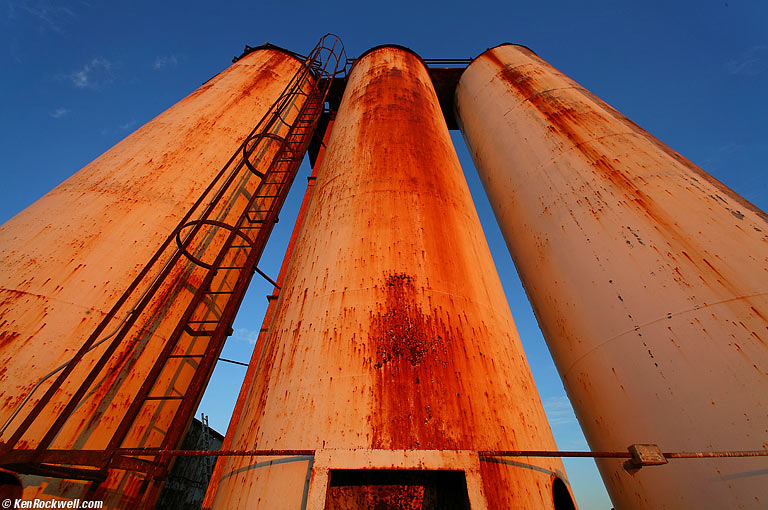
But just as the sun breaks the horizon the landscape is bathed in the most wonderful light, illuminating everything it strikes in hues of red and orange. For this brief period of the day the landscape is a magical place – full of atmosphere and a real tonic for those who witness it.

It is these transient moments of light, this explosion of colour and this unfolding drama that makes dawn an event not to be missed.

There’s no doubt that great dawn light will make your images extra special, but are you prepared to head out in the gloom in the hope of capturing that magic?

It’s a risk. It might be cloudy. You might get cold. You might be tired. You might not get there in time.

There are lots of reasons not to go, not to get out of bed at 3am, not to walk for an hour in the dark. But the reality is that to get the images you crave, you have to. You have to push yourself. You have to make the effort.

Shooting golden hour photography in the dawn hours is more of a physiological challenge than a photographic one. It helps a lot if you team up with someone, as you are almost certain to make the effort if you have arranged to meet a friend. You must also plan well and be prepared.

This is key because you need to be clear where you are heading, how long it’s going to take you to get there, and be confident that you can find the right spot.

A pre-visit in good light is the best way to determine this, and is useful for scouting the location for suitable viewpoints. Take a GPS with you, if you have one, to mark favoured spots.

Some landscape views may only work well at certain times of the year, depending on the position of the sun. You can determine where this will be by using a sun compass or an app that shows you where the sun will rise each day.

From this you can then work out exactly where you need to aim your camera, and also which parts of the landscape are going to be illuminated in golden light.

When shooting at dawn before the sun is up, the best colour is usually in the eastern sky. Try to find a focal point to set against this.

Perhaps a silhouette of a tree or building. Alternatively use calm water to reflect the sunrise. A reed fringed lake or one surrounded by trees works well. As the colours intensify, keep shooting as the light changes, and reframe your shots to capture a range of images.

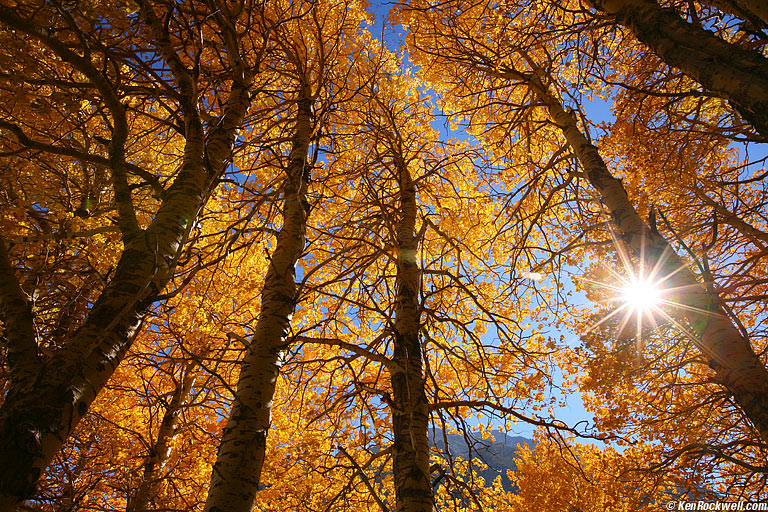
To shoot the sun as it breaks the horizon, set the aperture to f/16 to get the optimum sunburst effect. It also helps if you partially hide the sun behind a tree or rock to reduce the intensity of light and overcome problems with flare.

Once the sun gets too bright to usefully work with, turn around and shoot in the opposite direction to catch the warm light on the landscape. Any surface that is angled towards the sun will catch the light.

This contrasts really well with any shadow areas, and gives the landscape depth. Choose your position carefully though to avoid your own shadow creeping into the picture!


Shooting at sunrise involves some tricky lighting conditions. Generally, if you expose for the bright sky, the foreground will come out much too dark and lack detail.

The easiest way to resolve this is to use a neutral density graduated filter (for instance an 0.9ND grad) to reduce the exposure for the sky while keeping the exposure for the foreground the same.

Before fitting the filter, take a meter reading from the foreground (excluding the sky) and set this exposure in Manual mode.

Then recompose and fit the filter so that the darker part covers the sky and take the shot.

Alternatively, take one shot with the exposure set for the foreground and a second exposed for the sky, then blend the two images in Photoshop.

Three ways to give your golden hour photography an advantage


Be the early bird

Aim to reach your destination in good time. The best colour in the sky is often 15- 30 minutes before sunrise, so you need to be set up and ready to shoot to capture the quickly changing light.


Ensure sharp shots

Dawn photography means shooting in low light, so take steps to make sure your images are pin sharp. Set up a tripod on a solid base, or push the legs into soft ground to add stability. Use a remote release in combination with mirror-lock up to prevent internal camera vibrations.


Control the exposure

The lighting can be variable at dawn, causing major differences between the exposure for the sky and land. Using Manual metering take a reading from a mid-tone in the foreground and then fit a neutral density graduated filter to reduce the exposure for the sky to balance the shot.
Tips to remember when shooting golden hour photography


Stay dry

One disadvantage to shooting early in the morning, especially in the summer, is the dew. So it’s a good idea to wear waterproof trousers and boots in order to avoid getting wet and uncomfortable. A plastic sheet will also help keep your camera bag dry.

Seek out mist

Keep an eye on the weather forecast and look out for high pressure with cold clear nights and little or no wind. Mist often appears over rivers, lakes and damp ground, so it’s always worth visiting such locations to increase your chances of successful shots.

Shoot long exposures

Pre-dawn light is an ideal time to shoot creative long exposures of moving water or clouds. Set the lowest ISO and the aperture to f/16 or f/22 for the slowest shutter speed. For even longer exposures, you’ll need to fit a polarizer filter or neutral density filter.

Take a hike

Don’t restrict yourself to low level shooting. If you’re visiting hilly locations, the valleys will be cast in deep shadow until well after the sun is up – so head for the hilltops instead to catch the first rays of sunrise.

References:


Helpful tips for wide angle lenses


Ultrawide lenses are the most difficult lenses to use well. Ultrawides are not for "getting it all in." Ultrawides are for getting yourself, and therefore the viewer, right smack into the middle of something. Ultrawides are for putting next to the muzzle of Dirty Harry's revolver to put it in your face. If you can't or won't get close, leave the ultrawide at home.

Ultrawides rub the viewer's nose in your subject. Properly used, ultrawides grab your viewer and yank him into the middle of your situation.

Ultrawide lenses are for getting close and bringing the viewer into the photo, not for fitting a subject into a photo.

Ultrawides are not for the faint of heart. For newsmen, ultrawides are for jamming into the face of an enraged wino brandishing a feces-covered broken bottle to exaggerate his crazed anger and crude weapon.

Most people use ultrawides too sheepishly, and get crummy results with tiny subjects dwarfed in the middle of an open frame. When I use my 14mm I constantly have to force myself to get closer and pay rapt attention to the sides of my viewfinder, which are too often blank or loaded with junk.

Ultrawides require you to get very close and personal to anything you are shooting. Even a fraction of an inch (or cm) will make a huge difference in your composition, so you need to be very deliberate with your movement.

If you use them properly, you'll be rewarded with dynamic images. I've discovered that regardless of how many lenses I use, and however many photos I make on a trip, the ones I ultimately love the most are always the ones made with the widest lens I brought.

How Wide is Wide

All this becomes more important as your ultrawide gets wider. For 24mm lenses, you can ignore all of this. For 20mm lenses you ought to pay at least a little attention. For 17mm lenses you'll need most of this, and with 14mm lenses you need to know all this, otherwise the only good photos you'll probably get will be from dumb luck.

Everything here applies to all lenses, however normal and tele lenses don't exhibit the crazy properties I'll be describing. The wider you get, the crazier things become and the more attentive you need to be.

28mm and 24mm lenses are still pretty normal as wide lenses go. If 24mm (16mm on DX and 1.6x) is your widest lens, you won't see or need much of what I'll discuss here.

When you get to 20mm lenses (12mm on DX and 1.6x), things start to get a little weird. At 18mm and 17mm things are getting very weird, and by 15mm, 14mm and 13mm things are totally out of control. This is why some of us love ultrawide lenses, however you have to understand and be able to make productive use of the weirdnesses of ultrawide lenses. You have to shoot full-frame or FX to get the equivalent of 14mm; there are no lenses that wide for the little formats.

Getting it all in

Most beginners, myself included for 15 years, think wide-angle lenses are for "getting it all in."

They think that the wider the lens (or stitched panorama), the more encompassing, impressive, huge and all-enveloping will be the result.


I don't have any really bad examples of "getting it all in" shots, so this one, made in good light, will have to suffice.

Beginners know that wider lenses get more in, and so the pictures must be better. They know that 14mm lenses are expensive because pro organizations like ASMP mandate camera companies to charge more so that only pros can afford them and get the "good pictures."

As a kid, I first got a 35mm wide angle, than a 25mm Lentar wide-angle, then a 24mm Minolta Rokkor-X wide angle, a 17mm Tokina in 1984 and then my ultimate, the 15mm Nikkor back in 1992.

Oddly, my pictures sucked.

Why is that?

All that most people get with ultrawide lenses are parking lots in the bottom half of their image, and nothing anywhere except for the center. Worse, ultra-wides see all the distracting junk on the side of your subject and weaken the shot.

The shot above is made in the middle of the Mojave Desert, so there isn't anything on the sides. I got lucky.

The Easy Way

The best photos most users get with ultrawides are made inside large spaces, like Grand Central Station or stately homes. These highly-detailed spaces usually make for fun photos regardless of where you put or point the camera.


These photos are fine, but let's learn how to get great photos everywhere.

Scale

Painters understand scale, but few photographers do.

Scale means paying attention to the size at which an image will be printed as you're creating it.

Images have entirely different meanings when printed at different sizes.

A photo of a mouse printed at 4x6" (10x15cm) is normal. The same photo printed at 20x30" (50x75cm) is kind of weird. Why would someone make a print of a tiny mouse so big?

The reason photos of the Grand Canyon usually lack the "you are there" feeling is because they are only printed a few feet wide at most. A 40x60" (1x1.5m) print is a big print, but still doesn't do the Grand Canyon justice. Show the Grand Canyon as an IMAX movie as shot from a moving helicopter, and the audience feels it.

Panoramic stitching is making things worse today because anyone, even with most Canon point-and-shoots which come with free software, can make an image with nothing in it. In the old days, you had to buy a $2,000 lens. Let's face it: when you print that panorama at the same size as a normal image, doesn't it seem to lack the "you are there" feeling you used to get before easy panoramas?

Big things need to be printed bigger. If you want to "get it all in," you'd better be prepared to print huge. If you aren't going to print huge, the only thing an exotic wide lens or panorama does is make the things in your picture too darn small.

Even if you print 20 feet (6m) tall with ultrawide shots, you're still a long way away from making good images. Scale is only one of many basic elements of creating an image.

Composition: Impact in Normal-Sized Images


What makes a great image doesn't change with what lens you use.

What changes with an ultra-wide lens is how much more difficult it is to get your subject framed the way you want it.


Most people would be perfectly happy with this shot, but look at the sides. Nothing. This shot really only has anything going on in the central square portion of the frame. I wasn't close enough. I walked into this place, said "wow," and popped off a few without thinking.

I put the bottom of a column in the lower right, but I didn't get it to the bottom of my frame. I wasted the bottom inch on the right, and the entire left side is almost all devoid of anything meaningful.

Who are the people in the lower left? Just like everything in life, if something isn't adding to the composition, it's taking away.

The water thing was only 10 feet away, but it may as well have been a mile. Print this shot 20 feet tall and it will be impressive, but how can we make it stronger in the sizes we really use?
Get Close!

The hardest part with ultra-wides is getting close enough.

You can never get too close!

You have to push yourself to get and stay close enough.


For this shot, I was leaning over the edge of the fountain to get close enough to the astronomical device to use it as a compositional element. Of course this is all hand-held: a tripod would have gotten in the way, not worked well in the fountain, not allowed me the precision I needed in positioning the camera, and would have gotten me thrown out.

Not that this is a great shot, since the elements on each side are each fighting to pull your eyes out of the frame in opposite directions, but these snaps show how I have to approach every scene with an ultrawide.

Watch your edges and make sure your subject fills the frame. I'm always amazed at just how much wasted space happens at the edge of my images unless I work at paying attention to the sides of my finder with a 14mm lens.

If I get lazy, all I get is a smaller subject in the middle with loads of space between it and the frame edges. I wind up cropping, which just eliminated the whole point of using an ultrawide lens. 


Position

With longer lenses, the direction in which you point the camera is the most critical element. With ultrawides, camera position is more critical. Even a fraction of an inch makes a huge difference in composition.

I'm very serious: as I hand-hold my camera inches away from something, my breathing changes my composition. I have to be careful and shoot at just the right time.

In the shot above, I'm only inches away from the naked lady.

Forget tripods, unless you're using a macro positioning rail. Those rails only adjust in two directions, not all three, so you'll need a tripod with a geared-rise. Position has to be within fractions of an inch. I can't place a tripod that precisely. Ultrawides aren't like wide, normal and tele lenses where an inch or two makes no difference. Used up close, a half-inch can make or break a photo with an ultra-ultra wide.


Watch your edges

I don't look at the center of my image when composing. I have to keep looking at the edges to make sure things are close enough.

When fine-tuning balance, I look away and compose out of the corner of my eye. It sounds silly, but this is important in abstracting your composition away from reality so you can see the basic structure of the image and make it strong.

Lines

Ultrawide shots are all about lines.

Personally, if there are lines to be had, I seem to like having one leading in from the lower left corner. I prefer to have the lines enter from the corner itself, not one of the sides.

This is just me. Even I'm surprised at how I consistently see the world this way.


Inclusion and Exclusion

Painting is an art of inclusion, meaning that something only gets into the painting if the painter paints it that way. You can always tell a sloppy painter who's done watercolors from a photo because of all the needless junk. If you see telephone poles, crooked horizons and cars stopped in the middle of the street, it's obvious a painting was made from a snapshot.

Photography is an art of exclusion, meaning that everything gets into your photo unless you go out of your way to exclude it. You must always watch for distractions. This takes experience, since by human nature we don't see these distractions until we get our pictures back.

Most people point a camera directly at a subject and shoot. It takes training to look all over to ensure an image only includes what contributes to making it stronger.

Ultrawides get everything in, whether we want them to or not. This is another reason they are so difficult to use well. Unlike more reasonable lenses, ultrawides have such huge depths-of-field that everything is in focus, even the unwanted junk up and down, left and right.

When shooting ultrawide, watch your corners to fill the frame with what you want, and be sure that there isn't any distracting junk.


Near-Far Relationships

Long lenses compress perspective: they seem to squeeze everything into looking like it's in the same plane.

Ultrawides do the opposite: they expand the apparent depth of an image. Shots made with ultrawides push back the background, and since you have to get close, pull near objects even closer.

Ultrawide lenses exaggerate the difference between near and far. This is one of the main reasons we love them!

Expanding Space


Exaggerating depth means that exteriors and interiors seem more spacious. A normal lens will just show a section of one wall of a room, while an ultrawide can show two, and often three, walls at once.

The ultra-wide shot pushes the back wall back and makes a room look many times deeper than it is.

An ultrawide will make a small back yard seem like a park.

This effect is so powerful that you have to be careful. When I posted an online ad to rent out my old condo, I had people calling from all over the USA thinking it was such a deal because it looked cavernous. I had to explain this effect to them, but they didn't believe me and I people were calling from as far away as Pittsburgh trying to leave deposits, sight unseen.

If you shoot real estate listings for a living, an ultrawide lens pays for itself fast.

Sucked-out Corners


The corners of ultra-wide shots look as if someone printed the image on a rubber sheet and pulled-out the sides and corners. If photographing people, beware that they'll look fat on the sides if standing (like the example of me below), or skinny if they're lying down, since the sucking stretches things towards the edges and especially the corners.

Alignment

Ultrawides exaggerate any misalignment between film plane and subject plane. Use this to your advantage.


This snap looks pretty crazy, but the camera was pointed down only slightly. Even this slight tilt has forced all the lines to converge in crazy ways. If the camera is level, the results are boring:


Polarizing Filters


Don't do it!

The sky changes its polarization as you look from left to right. The sky has its largest amount of polarization, and thus polarizing filters have their greatest effect, at 90 degree angles from the sun.

Used on normal and tele lenses, POL filters have more or less effect depending on where you point them.

Used on lenses that can see a broad expanses of sky, a POL will render the more polarized areas much darker than the other areas. This causes nasty dark bands in the sky, and is why I never use a polarizer with an ultrawide lens.

Reference:

Digital Darkroom Techniques

1) Selecting part/s of an image

You can use the magic wand to do selections of tonally similar areas to either replace or
modify (use ‘Shift click’). Items could be blocks of colour you wish to change (for instance
using Hue and Saturation) or parts of an image you want to replace.

One of the most useful extraction tools however is the ‘quick selection tool’ in the main
tool palette (4th one down). This almost seems to read you mind when making a selection
and is therefore very rapid.

You can the use ‘Layer Masks’ in combination with a selected area/s hide but not delete.
This can be found at the bottom of the layers palette (the icon is a circle in a rectangle).
We used this when doing the montage of faces in the first Photoshop workshop.

2) Image Extraction

The lasso or the magnetic lasso may seem like the obvious way to extract an image when
creating a montage but from Photoshop CS3 an extraction filter especially for this purpose
which was ideal when there were issues like hair or fur on the edge of the person or animal
etc you were trying to select. Unfortunately for CS4 it was removed and became an
optional plug in!

For the last two versions of Photoshop (CS5 & CS6) it has been dropped altogether. It is now
recommended that ‘refine mask’ is used in the ‘Select’ menu (shown in lecture). A slightly
‘cheesy’ but helpful explanation can be found here:

http://tv.adobe.com/watch/the-russell-brown-show/advanced-masking-with-photoshopcs5/

Faking slow shutter speed…

3) Motion Effects

You can use the blur filter for things like motion blur and radial blur to get a sense of
movement – though using shutter speed on the camera is usually preferable.

Faking shallow depth of field…

4) Altering depth of field

There are several ways you can ‘fake’ shallow depth of field such as:

• If you want to keep specific areas in sharp focus select these areas (Using the extraction
tool for example) and put then in a new layer. Now, in the background layer (i.e. the area
you want in soft focus) use a ‘quick layer mask’ (bottom of the tool palette) and draw a
gradient using the gradient tool, deselecting the quick mask and add a Gaussian blur from
the filters menu.

• Use a feathered selection (about 70px is a good starting point), invert the selection and
adding a Gaussian blur.

5) Monochrome from colour (…for that Ansel Adams ‘look’…)

Changing to monochrome (black and white) is much more than just converting to grey scale
– and don’t use the monochrome option on some digital cameras. Its much better to shoot
in colour then convert to black and white using Channel Separation. The old way to do this
was either use the channels pallet or for more control use the channel mixer under image >
adjustments > Channel mixer (remembering to select monochrome!)

These options are still there but in CS4 there is also the ‘Black and White’ option (under
the ‘Adjustments’ palette). The title ‘Black and White’ belays just how much control it
gives you on the image – you can apply virtual colour filters and adjust separate channels –

making you into a bit of an Ansel Adams…


6) Stitching images in Photoshop

You can use the menu option file/automate/photomerge to stitch images. Choose your
source files (i.e. the pictures you want to stitch) and Photoshop will try and merge them.
You can also do this manually in the way I showed you in the lecture – but it can be time
consuming.

Paul Hazell

http://staffweb.worc.ac.uk/photomodule/cdme2011&3011/Session-8/advanced-Photoshop.pdf

Testing out the big lens - 150-500mm

I was in Uni today getting a camera and I thought I'd book out the 150-500mm telephoto lens to have another go at some close ups of the moon, if it's not too cloudy.


Before trying to use this huge lens in the dark I thought I'd better have a go with it first.


Here's one of the first shots I took from my bedroom window testing out the zoom capability, trying to achieve a shallow depth of field.

After this I went out onto the back garden to see if I could get some photos of the birds that have been nesting in the tree just past the end of my garden. Of course after being there every day, now that I have a camera there's none to be seen. 

Fortunately one of the neighbours cats was on next doors shed roof. The tripod wasn't tall enough so I had to shoot these handheld. It was a very cloudy day but the clouds acted as a diffuser creating nice even lighting. This was shot at 1/800 f/6.3 which worked fairly well but I could have done with a quicker shutter speed using such a larger lens handheld. The wide aperture creates a nice contrast in focus, drawing the eyes straight to the cat. I particularly like this first one, she's almost looking straight into the lens. If I'd used the tripod I imagine these shots would have been much more crisp.


She disappeared before I had the chance to get any more shots. I'll just wait until later tonight to have another go at some close ups of the moon if it's clear enough.

Wednesday, 27 November 2013

What is a Panorama?

Time to actually find out what a panorama actually is..

"A panorama (formed from Greek πᾶν "all" + ὅραμα "sight") is any wide-angle view or representation of a physical space, whether in painting, drawing, photography, film, or a three-dimensional model."

"Panoramic photography is a technique of photography, using specialized equipment or software, that captures images with elongated fields of view. It is sometimes known as wide format photography. The term has also been applied to a photograph that is cropped to a relatively wide aspect ratio. While there is no formal division between "wide-angle" and "panoramic" photography, "wide-angle" normally refers to a type of lens, but using this lens type does not necessarily make an image a panorama. An image made with an ultra wide-angle fisheye lens covering the normal film frame of 1:1.33 is not automatically considered to be a panorama. An image showing a field of view approximating, or greater than, that of the human eye – about 160° by 75° – may be termed panoramic. This generally means it has an aspect ratio of 2:1 or larger, the image being at least twice as wide as it is high. The resulting images take the form of a wide strip. Some panoramic images have aspect ratios of 4:1 and sometimes 10:1, covering fields of view of up to 360 degrees. Both the aspect ratio and coverage of field are important factors in defining a true panoramic image."


"The word was originally coined in the 18th century by the Irish painter Robert Barker to describe his panoramic paintings of Edinburgh and London. Shown on a cylindrical surface and viewed from the inside, they were exhibited in London in 1792 as "The Panorama". The motion-picture term panning is derived from panorama."


"In the mid-19th century, panoramic paintings and models became a very popular way to represent landscapes and historical events. Audiences of Europe in this period were thrilled by the aspect of illusion, immersed in a winding 360 degree panorama and given the impression of standing in a new environment. The Dutch marine painter Hendrik Willem Mesdag created and established the Panorama Mesdag of The Hague, Netherlands, in 1881, a cylindrical painting more than 14 metres high and roughly 40 meters in diameter (120 meters in circumference). In the same year of 1881, the Bourbaki Panorama in Lucerne, Switzerland, which exhibits a circular painting, was created by Edouard Castres. The painting measures about 10 metres in height with a circumference of 112 meters. Another example would be the Atlanta Cyclorama, depicting the Civil War Battle of Atlanta. It was first displayed in 1887, and is 42 feet high by 358 feet wide. Even larger than these paintings is the Racławice Panorama located in Wrocław, Poland, which measures 120 × 15 metres"

"One of the first recorded patents for a panoramic camera was submitted by Joseph Puchberger in Austria in 1843 for a hand-cranked, 150° field of view, 8-inch focal length camera that exposed a relatively large Daguerreotype, up to 24 inches (610 mm) long. A more successful and technically superior panoramic camera was assembled the next year by Friedrich von Martens in Germany in 1844. His camera, the Megaskop, added the crucial feature of set gears which offered a relatively steady panning speed. As a result, the camera properly exposed the photographic plate, avoiding unsteady speeds that can create an unevenness in exposure, called banding. Martens was employed by Lerebours, a photographer/publisher. It is also possible that Martens camera was perfected before Puchberger patented his camera. Because of the high cost of materials and the technical difficulty of properly exposing the plates, Daguerreotype panoramas, especially those pieced together from several plates (see below) are rare."


An 1851 panoramic showing San Francisco from Rincon Hill by photographer Martin Behrmanx. It is believed that the panorama initially had eleven plates, but the original daguerreotypes no longer exist.

After the advent of wet-plate collodion process, photographers would take anywhere from two to a dozen of the ensuing albumen prints and piece them together to form a panoramic image. This photographic process was technically easier and far less expensive than Daguerreotypes. Some of the most famous early panoramas were assembled this way by George N. Barnard, a photographer for the Union Army in the American Civil War in the 1860s. His work provided vast overviews of fortifications and terrain, much valued by engineers, generals, and artists alike.

Following the invention of flexible film in 1888, panoramic photography was revolutionised. Dozens of cameras were marketed, many with brand names heavily indicative of their time. Cameras such as the Cylindrograph, Wonder Panoramic, Pantascopic and Cyclo-Pan, are some examples of panoramic cameras.


Short Rotation

Short rotation, rotating lens and swing lens cameras have a lens that rotates around the camera's rear nodal point and use a curved film plane. As the photograph is taken, the lens pivots around its nodal point while a slit exposes a vertical strip of film that is aligned with the axis of the lens. The exposure usually takes a fraction of a second. Typically, these cameras capture a field of view between 110° to 140° and an aspect ratio of 2:1 to 4:1. The images produced occupy between 1.5 and 3 times as much space on the negative as the standard 24 mm x 36 mm 35 mm frame.

Cameras of this type include the Widelux, Noblex, and the Horizon. These have a negative size of approximately 24x58 mm. The Russian "Spaceview FT-2", originally an artillery spotting camera, produced wider negatives, 12 exposures on a 36-exposure 35 mm film.

Short rotation cameras usually offer few shutter speeds and have poor focusing ability. Most models have a fixed focus lens, set to the hyperfocal distance of the maximum aperture of the lens, often at around 10 meters (30 ft). Photographers wishing to photograph closer subjects must use a small aperture to bring the foreground into focus, limiting the camera's use in low-light situations.


Rotating lens cameras produce distortion of straight lines. This looks unusual because the image, which was captured from a sweeping, curved perspective, is being viewed flat. To view the image correctly, the viewer would have to produce a sufficiently large print and curve it identically to the curve of the film plane. This distortion can be reduced by using a swing-lens camera with a standard focal length lens. The FT-2 has a 50 mm while most other 35 mm swing lens cameras use a wide-angle lens, often 28 mm].

Full Rotation

Rotating panoramic cameras, also called slit scan or scanning cameras are capable of 360° or greater degree of rotation. A clockwork or motorized mechanism rotates the camera continuously and pulls the film through the camera, so the motion of the film matches that of the image movement across the image plane. Exposure is made through a narrow slit. The central part of the image field produces a very sharp picture that is consistent across the frame.

Digital rotating line cameras image a 360° panorama line by line. The camera's linear sensor has 10,000 CCD elements. Digital cameras in this style are the Panoscan and Eyescan. Analogue cameras include the Cirkut, Hulcherama,Leme, Roundshot and Globuscope.


Fixed Lens

Fixed lens cameras, also called flatback, wide view or wide field, have fixed lenses and a flat image plane. These are the most common form of panoramic camera and range from inexpensive APS cameras to sophisticated 6x17 cm and 6x24 cm medium format cameras. Panoramic cameras using sheet film are available in formats up to 10x24 inches. APS or 35 mm cameras produce cropped images in a panoramic aspect ratio using a small area of film. Advanced 35 mm or medium format fixed-lens panoramic cameras use the full height of the film and produce images with a greater image width than normal.

Because they expose the film in a single exposure, fixed lens cameras can be used with electronic flash, which would not work consistently with rotational panoramic cameras.

With a flat image plane, 90° is the widest field of view that can be captured in focus and without significant wide-angle distortion or vignetting. Lenses with an imaging angle approaching 120 degrees require a center filter to correct vignetting at the edges of the image. Lenses that capture angles of up to 180°, commonly known as fisheye lenses exhibit extreme geometrical distortion but typically display less brightness falloff than rectilinear lenses.

Examples of this type of camera are: Hasselblad X-Pan (35 mm), Linhof 612PC, Horseman SW612, Linhof Technorama 617, Tomiyama Art Panorama 617 and 624, and Fuji G617 and GX617 (Medium format (film)).

The panomorph lens provides a full hemispheric field of view with no blind spot, unlike catadioptric lenses.


Segmented

Segmented panoramas, also called stitched panoramas, are made by joining multiple photographs with slightly overlapping fields of view to create a panoramic image. Stitching software is used to combine multiple images. In order to correctly stitch images together without parallax error, the camera must be rotated about the center of its entrance pupil.Some digital cameras can do the stitching internally, either as a standard feature or by installing a smartphone app.


Catadioptric cameras

Lens and mirror based (catadioptric) cameras consist of lenses and curved mirrors that reflect a 360 degree field of view into the lens' optics. The mirror shape and lens used are specifically chosen and arranged so that the camera maintains a single viewpoint. The single viewpoint means the complete panorama is effectively imaged or viewed from a single point in space. One can simply warp the acquired image into a cylindrical or spherical panorama. Even perspective views of smaller fields of view can be accurately computed.

The biggest advantage of catadioptric systems (panoramic mirror lenses) is that because one uses mirrors to bend the light rays instead of lenses (like fish eye), the image has almost no chromatic aberrations or distortions. The image, a reflection of the surface on the mirror, is in the form of a doughnut which then needs software in order to unwrap to create a flat panoramic picture, normally supplied by the company who produces the system. Because the complete panorama is imaged at once, dynamic scenes can be captured without problems. Panoramic video can be captured and has found applications in robotics and journalism. The Mirror lens system using only a partial section of digital cameras sensor therefore some pixels are not used. recommendations are always to use a camera with a high Pixel count in order to maximize the resolution of the image.

Thursday, 14 November 2013

Star trails


How to Photograph Star Trails: The Ultimate Guide

Photographing the night sky can be a surreal experience, and star trail photography is highly rewarding if you have a bit of patience. Those 2 hour long single exposures can turn an otherwise mundane day shot into an otherworldly image.


When photographing star trails, your goal is to allow your camera to pick up light it wouldn't normally by using extra long exposures. Working under the night sky means that the amount of available light is severely limited – most likely, you'll only be able to capture the stars in the sky depending on if there are other light sources around, unless you’re planning on spending a few hours for each exposure.


With that being said, it's very important to utilize proper long exposure techniques: locking your mirror, mounting your camera on a secure tripod, and using a remote cable release for your shutter.

However, there are additional things to consider when photographing star trails that will set your night images apart from the crowd – how do you get those fantastic lines of light?

There are two methods popular with star photographers – using one very long exposure (long enough to register some noticeable star movement; at least 30 minutes) OR taking many shorter exposures and stacking those images in a way that shows sequential movement.


One Long Exposure

To capture star trails using one long exposure, there are a couple important things to consider. You need to let as much light into your lens as possible for those stars to register (the why’s of this are explained below) – this means using a fast lens, preferably in the f/2.8 range.

When photographing stars under one exposure, you need to do it during a new moon night – meaning that the moon is nowhere to be seen. If you have anything more than a crescent, your exposure will be limited to the 10-minute range because of the ambient light, which won't do much for star trails. For this kind of photography, darkness is your best friend.

Ultimately, you're aiming for your environment to be illuminated by the stars themselves – yes it's possible! However, this entirely depends on the length of your exposure. The image below is the result of an 80 minute exposure taken under a new moon – you can see that the foreground is exposed nicely and the star trails are outstanding.


When calculating your exposure, it would be best to do a shortened test shot so you're not waiting a ridiculous amount of time just to see if your settings are correct. Many night photographers will jack up their ISO as far as it'll go and shoot wide open – you'll rarely find an instance where you'll be taking a photo shorter than 30 seconds here. Of course the test shot will be entirely unusable due to noise and lack of trails, but it will give you a base to calculate what settings are needed with an ISO of 100.

Image Stacking Shorter Exposures

An alternative to waiting an hour or more for your exposure to finish is to take sequential images and stack them together in post process to get your star trails. In short, your exposure should be just long enough to register your stars as bright objects in the sky before moving onto the next one. It’s not uncommon to have several hundred images to stack taken over the course of a few hours.

Post process software such as ImageStacker and DeepSkyStacker will automatically throw all your images together and produce a stunning star trail.

Another benefit to image stacking is that you have all the necessary photos to make a time lapse video – here’s a short clip of what you can accomplish with this method of star trail photography: both the time lapse video and the composite trail image are shown here.

Tip: Between shots, try waiting a few seconds to let your sensor cool down a bit as a hot sensor = more digital noise

Aperture: Wide Open or Narrow?

A common question – or rather misconception – with star trail photography is why wouldn't you use a small aperture (say f/8 or above) for a sharper image rather than shoot wide open? You're already shooting hour-long exposures so the timing isn't a concern, surely it's better to have a sharper photo, especially if you have other focal points (foreground interest, etc).

The issue with photographing stars is that they move – this is why we want to photograph their trails in the first place. With that in mind, there is a delicate balance to find with your exposure that's more than just how long your shutter is open.

Wider apertures allow for shorter exposure times because they let more light in than narrow apertures. Focus on that last part – they let more light in. Considering that stars are constantly moving, you need to make sure that they're registered on your sensor before they move – otherwise your star trails will be very dim, perhaps even non-existent depending on your chosen f/stop. Imagine doing a two-hour shoot where your foreground is lit nicely, but your star trails look no more than a slight variation in tones on the night sky.

Considering this, it's a good idea to have a lens that's capable of very wide apertures – such as f/2.8 or even wider. The wider your aperture, the brighter your star trails will be.

Finding the Poles

As you may have noticed, several of the example images used here have a circular pattern around a more central location- also known as the north and south poles. This is especially apparent in the video link above. In order to replicate this, you need to locate the poles first and aim your camera for it.

If you’re an astronomy beginner like me, this may seem a bit daunting – not to worry though. If you’re shooting towards the north pole, the Polaris (a.k.a. the North Star) is what you’re aiming for – it’s the last star on the handle of the Big Dipper, so if you locate that you’re good to go.

The south pole is a bit more difficult to eyeball as there’s no prominent bright star near the pole to help like the Polaris. You can still gather an idea of where it is though by using this free software to help pinpoint the south and north poles – very handy.

More Tips

Light Pollution – Whether from a nearby city or the street lamp at the end of your driveway, light pollution can greatly affect long exposures. This isn’t necessarily a bad thing though – in fact, it may add to the ambiance of your photo, such as a star trail image that begins during the blue hours. Experimenting with atmospheric light can be a creative way to make a unique star trail image – just be aware that the lighter your sky is, the less contrast your star trails will have.

Clear Skies and Dry Air – Obviously you don’t want to photograph star trails under a cloudy sky, but other atmospheric filters can interfere with your night photography – air pollution and humidity being the top annoyances. The best locations for a clear sky would be high up and away from any congested cities, and take on a night with very low humidity.

Reference: