Thursday, 14 November 2013

Panorama tutorial and tips

As this module is primarily about panoramas I thought it'd be useful to look for some advice on creating them to avoid commonly made mistakes. Below I have selected sections of an article/tutorial I found online that explains the process fairly well:


As someone who has made every mistake possible while trying to understand the art and science of making panoramas, I'm here to tell you that it isn't rocket science.

By the time you finish reading this article, you're going to be grabbing your camera bag and rushing out the door to try it for yourself.

The first step in the whole process of course, is selecting a suitable landscape to photograph. And as we have all heard: you should always choose one of the “golden hours” of the day, meaning an hour before, during or after sunrise or sunset. I personally favor twilight, whether morning or evening. Twenty minutes to half an hour after sunset (or before dawn), the sky and clouds have an incredible glow that can range from deep pastel colors all the way to the most intriguing blues and violets.


Illustration: Nubble Light, York, Maine: a 20 image panorama.

The second step is to set up your dSLR on a good, solid tripod. I can't say enough about the merits of a sturdy tripod, but I'll leave it at this advice: if you spent less than $100, there's a good chance your tripod may be flimsy enough to introduce some vibration or camera shake that could ruin your images.

And while it's also nice to have a ballhead, a good 360 degree rotating head that can support your camera in vertical orientation will usually do the trick. I use a very old Bogen 3011 tripod and a Manfrotto 3025 panoramic attachment for my panoramas, but I have made do without the panoramic head for years successfully, and sometimes still don't use it at all. Other people use more technical equipment, like the Panosaurus or the Nodal Ninja, both of which allow one to be very precise. A panoramic head or ball head simply make the whole process easier.

The third step is to put your camera in vertical (portrait) orientation, making absolutely certain that your tripod and camera are completely level. To help with this, I use an Adorama Double Bubble Level, which looks a lot like a very small carpenter's level, and attaches in the hot shoe of your camera. It helps so you don't get stitching errors or a bowed, wavy-looking banner of a panorama.

Now it's time to take some pictures. First of all, I shoot solely in RAW format. RAW allows you the ability to really get the most out of each file, whereas even high-quality jpegs have discarded much of the workable information that is left in a RAW file.

I prefer to shoot wide, using the Pentax DA 12-24mm ultra wide or the Pentax DA 18-55mm ALII lenses at f/13 or f/16 using ISO 100 or 200, but f/8 or above will suffice. (I know photographers who use such lenses as the Pentax DA 10-17mm fisheye, or the Sigma 10-20mm.)

Just like any other time, start by focusing one-third of the way into the landscape or architectural piece you want to photograph. You'll need to lock your focus at this point, or your focal point will change each time you depress the shutter button, which will leave you with out of focus and underwhelming final results. The best way to accomplish this is to simply switch out of auto focus mode and into manual focus mode once you have focused your lens where you want.


In addition, you'll need to lock your exposure after deciding what you feel will expose best for all the variations in light in the area you'll be photographing.

If you don't lock your exposure you will get what is known as "banding." Banding is when you have all different exposure values (darker and lighter) showing like slices throughout the many pieces in a stitched panorama.


I typically begin by setting my camera to “Aperture Priority” (Av) mode and then moving the f-stop setting to either f/11 or f/13, for maximum depth of field, carefully checking the view finder to note the shutter speed that the camera has automatically chosen to get a properly exposed picture.

I next switch to Manual mode and dial in that f-stop and shutter speed.

Very often you will be taking pictures where the sun is on one side of the picture and it can be quite dark or shaded in other parts. While some panoramic stitching programs are fairly good at equalizing the exposures, there will still be a lot of ugly variation in your finished file unless you lock the exposure.

So, now let's begin... We'll use this panorama as an example:


Illustration: Sunrise on Blue Hill Bay, Blue Hill, Maine: a 10 image panorama.

Each shot you take should be overlapped by 20 to 25% as you will get better stitching results.

While using a tripod is important, a wonderful thing I have discovered is that you can often take a handheld pano--even a very long one. As long as it is bright enough to handhold the camera at a fast enough shutter speed to avoid motion blur, you can stand in one central place, hold the camera at eye level and pivot at the hip from left to right or right to left, and you can get quite level panoramas, like this one, taken after a three hour climb that I knew adding the 12-pound weight of my tripod to wouldn't work for me:


Illustration: Tumbledown Mountain, Weld, Maine - a 20 image, 180 degree handheld panorama.

I have even done handheld 360 degree panoramas, like this one:


Illustration: Tommy's Park, Portland, Maine - a 45-image handheld panorama, stitched in Little Planet Projection using PTGui.

Finally, let's talk about how to put your panorama together. I sometimes use a program called PTGui, but mostly Photoshop CS4 stitches them together with great results. Not everyone has Photoshop OR PTGui of course... And there are quite a few free stitching programs out there to download that people have great success with, such as Hugin and ArcSoft Panorama Maker.

For ease of explanation, I'll demonstrate how I put together a panorama in Photoshop CS4.

Begin in Photoshop by selecting File> Automate> Photomerge:


Next, make sure you make the selections as circled below:

Auto Layout
Blend Images Together
Vignette Removal
Geometric Distortion Correction. Then click the Browse button to select the files you want to stitch together.


When your files are selected in the Source Files box, as seen below, click OK and let the pano-making begin!


It will take anywhere from ten minutes to an hour or so, depending on several factors:

  • The number of files. 
  • The size of the files. 
  • How level each shot is. 
  • The computer's CPU speed and amount of memory. 
  • If you are using Photoshop in 32-bit or 64-bit. 
You can expect your output file to look something like this:


Notice how the edges are rough and the right side curves upward a little? Apparently, I didn't have my camera as level as I thought I did! This is easily fixed in Photoshop by using the Warp command.

Before doing this, you'll need to flatten the many layers of your pano by clicking on:Layer Menu> Flatten Image. Once it has flattened, press <Control J> to make a new layer via copy. And then go to Edit> Transform> Warp:

A grid will be placed over your entire image (see below). You can pull on any of the dots or corners to re-shape your pano exactly as you'd like it by clicking on them and dragging gently in the directions you want to go. Notice how in the large red oval the off-kilter horizon has been mostly corrected. You can continue “warping” your pano until you're satisfied with the results.


And then, simply click on the Crop tool in the tools palette and a window will pop up, asking if you'd like to apply the transformation. Click apply, and after a few seconds, your pano will be ready to crop.


Now use the crop tool to crop the boundaries of the panorama, because your photo actually extends behind the area you can currently see. That extra area will be shown when you print it unless you crop it first. Click twice within the picture, allowing the crop to happen, like so:

You can finish your panorama with whatever techniques you would normally apply to your landscape photographs to make the best output image possible.

You can even go back and re-warp the panorama if you notice a place that isn't just right.

It isn't destructive to your file at all.

And if you happen to make a mistake, simply press Control Z to get rid of the last action you performed, or go to the Edit Menu> Undo.

Once you have flattened your file and saved it at 300 dpi as a jpeg or tiff, you will be ready to print, mat and frame it.

You now can do what you once thought impossible to do without a Panoramic View Camera.

You, my friend, are now a Panoramic Artist.

Go forth and panorama your world!


Illustration: Portland Head Light, 8 image vertical panorama.


Illustration: Blue Hill Bay, 20 image panorama


Illustration: The Victoria Mansion Dining Room, a 45 image, multi-level panorama

Reference:


http://www.photographyblog.com/articles/how_to_take_great_panorama_photos

Shooting On A Cloudy Day

We're really coming into winter now and as this project needs to be complete before January, it's quite likely that I'll mainly be photographing on cloudy days so I thought I'd look for advice on making the most of them.


The first thing to understand is what the clouds do. They essentially act as a diffuser for the sun and provide a much more even light over the subject and background. Depending on the thickness of the clouds minor shadows may exist or none may be present which can open up opportunities that wouldn’t normally exist on a sunny day.

The thickness of the clouds also regulates the brightness of the scene. For example some of our dreary Northwest days have very little light thanks to very thick clouds which contain lots of moisture. As a contrast east of the mountains, where more moisture is wrung out of the clouds, a high overcast will exists which lets plenty of light through providing more brightness.

High overcast in eastern Oregon provides reasonably even, diffused light on the subject.


On a cloudy day dramatic light and beautiful skies are not not something that will be in play. These factors usually cause me to focus more intimately on the subject. I’ll zoom more closely to eliminate an even and generic gray sky. I find a cloudy day is a good day to focus on details as the light can be very even which allows the entire scene to be lit at the same brightness.

Thanks to even light everywhere detail photos look fabulous on cloudy days.

On the other hand the clouds can be part of the subject. They provide an excellent top frame and when the clouds are interesting I’ll work to include them to give a sense of the day to the image. Clouds and rain are part of our environment so including them as part of the photo is certainly something that can add impact and help explain something about the subject. When I was a kid the BN suffered a slide on Stevens Pass and a news photographer was on scene to capture the train stopped at the slide. In the photo the rain drops and the gray skies were both visible which just added so much more context to the mud across the tracks.


Clouds can be part of the subject to offer framing or drama.

Behind the camera I tend to make the same exposure decisions I would make on any other day to get the best exposure on the subject. I determine what is more important about the scene and set my aperture, shutter, and ISO to match. Since cloudy days are often darker I find myself using higher ISOs. Generally photos exposed properly at high ISO don’t exhibit the amount of noise you see in a darker image so I don’t hesitate to head up to ISO 800 now and then (ISO 800 is the practical upper limit on my 20D). As with any photograph, I will take a few test photos to make sure my exposure choices are appearing on the back of the camera to be what I’m looking for.

Cloudy days are a good time to practice exposing to the right. I usually expose my images to the point where the brightest part of the scene just starts to get blown out (the red blinking areas on the image when viewing the histogram). This usually offers the best balance of light and dark areas and gives me something to work with in post. On cloudy days using this method will help to draw the maximum brightness out of a scene without over exposing.


Exposing to the right without blowing out highlights too much.

In Lightroom I use the same techniques as I would with any other photo. Since the colors tend to appear more saturated in a cloudy day photo I watch very carefully how much vibrance or how deep the tone curve is I apply. I tend to keep less contrast in a cloudy day photo to help bring out the details that are hiding in the depth of the shadows. Since our train subjects tend to be a bit dark on cloudy days I will also use the local adjustment brush to brush in a bit of brightness or to reduce contrast on the subject. Many times just a touch of brightness on the subject will really make it stand out from the flatness of the rest of the scene. Clouds can also become a bit washed out with exposing to the right so I’ll use the local adjustment brush on them too to bring them back to look natural.


Judicious use of the adjustment brush on cloudy day subjects can bring them out of the darkness. Final output is here.
Those are my thoughts on cloudy days. As with much of photography there isn’t necessarily a formula but I find these guidelines work for me. By all means if something moves you to do something that seems contrary because you think the product will be something special, DO IT! Photography is about creating so step outside of the norms and capture it your way.

Reference:

http://www.dogcaught.com/2009/11/23/photographing-on-a-cloudy-day/

Night sky photography

After looking at some of Chris Kotsiopolous's work, I decided to look for some advice on photographing the night sky. 

The night sky is variable. Some nights are grey and overcast, some filled with stars, yet others are busy with the movement of clouds on weather fronts. Long shutter speeds are the key to capturing imaginative and beautiful images of the sky at night, so be patient and this kind of photography will become second nature to you.

1

    Star trails


Due to the Earth’s rotation about its axis, it seems that the light from stars moves in circles around the celestial pole. These movements are detectable after about 5 to 10 minutes, and can be traced by your camera in the form of a streak. To photograph this magical effect, you need a sturdy tripod and lots of patience. Focus the lens to infinity and set the camera’s mode at Manual or Bulb shooting mode. With the use of a cable release you will capture the stars moving across the sky. These exposures can be a few minutes to several hours long. If you keep few things in mind, such as the timing, composition, and power of the battery, you can make photographing star trails simpler for you.

2

      Find the Right Location


The best place to view and photograph the night sky is in the rural countryside because cities have artificial lights which cause a phenomenon known as light pollution. You need to get away from artificial lights in order to see the stars well. A truly dark sky is preferred, but artificial lights keep the night sky from being truly dark. Many beginners aim at capturing the longest star trails by keeping the shutter open for long periods of time. However, they tend to underestimate the impact generated by ambient light in the sky, which can be hard to notice at times. In addition, residual light (such as moonlight) can have a devastating impact on long shutter speed photos. This is because when you keep the shutter open for say, nearly 20 minutes, an hour after the sunset, the camera may perceive it as a day shot. Similarly, a full moon night photo with an exposure time of around 10 minutes could also look like a day shot. Therefore, it is best to attempt such a picture with either a new moon, or well before the moonrise or after the moonset. The light emerging from the stars would be more evident at this time and the picture would be perfect.

3

     Use Long Exposures


When photographing the night sky with a long exposure, exposures of 15 minutes or longer will show the rotation of the Earth. You’ll need a wide-angle lens and a sturdy tripod, of course. You’ll want to use a cable release to eliminate camera shake of any kind, as it will RUIN your photo. Focus the lens to infinity and set the camera to B "Bulb" shooting mode. Set your aperture between f/2.8 and f/4 for optimal results, and depress the remote to open the shutter. You should keep your ISO at 100 to keep the digital noise at a minimum, because the sky is so dark and less prone to producing digital noise when the exposure is above 15 seconds. To complete the photo after your desired elapsed time, depress the remote again, and release the shutter.

4
 
    Aurors and Polar Lights


Photographing the atmospheric phenomenon of aurora borealis is a challenge for photographers. This difficulty is due to frequent spectacular changes in the brightness of the light. The charged solar particles move very fast and sometimes get hidden making it impossible to shoot them. However, if you follow these tips, you will be able to get the best aurora borealis photos. Anchor your camera on a strong tripod to keep it steady for longer exposures. Set the ISO at the range of 100 to 400. Shutter speed can be as long as 30 seconds depending on the amount of light available. Do not rely on the built-in light meter, which is better left for day time use. Although any kind of lens will do for aurora borealis photography, you should choose a wide-angle and faster lens.

5
 
  Cloudy Skies


As the light begins to fall, look at the cloudy skies. Watch the colors and how they merge though the cloud. Even though it is dark, you should try using an 80A blue cooling filter to enhance the blue cast of the sky and to reduce the yellow cast from the artifical lights. Use a wide-angle lens and opt for longer exposures. You can first try a few test shots, and then assess them carefully on your digital camera. You should be able to decide on the best range of exposures to capture some good photographs of an overcast sky.


S

     Recommended Settings

Metering after dark can be a problem, so make sure you choose the best option for your particular situation. If the conditions are both light and dark you need to use spot metering for an accurate reading. If the darkness is even you can use center weighted or evaluative metering. Don’t use flash if you can help it as this can affect the resulting image, creating an area of the photograph that is over-lit. Manual and Bulb modes are the best shooting modes for this kind of photography.

E
   
    Recommended Equipment

Night skies should always be photographed with the assistance of a tripod. Don’t forget to buy a cable release or a remote control for taking the picture – this is important because some shots will take up to 30 seconds or even more. Your lens ideally should have an infinity focusing mode and your camera should have the ability to do a mirror lock up - a feature in which the mirror in the camera moves out of the way before the shutter is released. This feature eliminates the vibration that occurs when the mirror slaps up into the camera housing. A wide-angle lens is the best choice for night skies, and a zoom makes it even more versatile.

C

      Conclusion


When taking pictures of the night sky, remember that patience is as important as is the ability to look at an image’s composition critically and decide what you need to change next time to make it better. As we stated earlier, the process of finding the right exposure length for the image you want is going to be a process of trial and error (in terms of lens length, shutter speed, aperture setting, as all three allow for different effects). With long exposures of over 30 seconds, a cable release is necessary to ensure tack sharp final images. For additional variety and perhaps better photographs of stars in the sky, you might want to try a few B&W shots. Dress warmly if the weather is cold, because sitting still on a cold night is much colder than walking in the cold, so extra layers may be needed. Remember to take a flashlight with you so you can adjust your camera in the dark. The more images of the night sky you take, the more you will learn the best way to photograph them.

Reference:

http://www.exposureguide.com/night-sky-photography-tips.htm

Perspective

To understand the role of perspective in photography I found this article which explains it well and how to create appropriate depth for the type of image you want to create.


“night bus” captured by David Hobcote
"When we see a photograph on computer screen or on prints, we are looking at a 2-dimensional representation of a real 3-dimensional scene. And that is what photography is all about – capturing a 3D scene onto a 2D image. I used to wonder how do photographers demonstrate “depth” or sense of “scale” in a (good) photograph. They use the concept ofPerspective.

This is one of the tricky areas of photography which if a photographer is not consciously aware of, can produce unwanted “distortions” or “flat” uninteresting images.

3D is real. A 2D depiction of a 3D scene is just an illusion exploiting how our brain synthesizes information to determine the “depth” in real-time. Powerful compositions can be created by applying the concepts of perspective in effectively converting a 3D scene into a 2D translation.


Let's start by formally defining 'Perspective'

Perspective in photography can be defined as the sense of depth or spatial relationships between objects in the photo, along with their dimensions with respect to the viewpoint (camera lens or the viewer).

Now let’s come down to the techniques -


I. BLOCKING, OVERLAP or OBSTRUCTION

This is probably the dumbest thing to tell. But let me tell you anyways. When we see an object blocking the view of another object, the first object is nearer to the viewer than the latter.

This clue to our brain regarding distance can be utilized in a photograph to depict the “depth” or distance between the objects also called overlap perspective. If this overlap is repeated in a same picture the viewer gets a sense of depth among various objects lying in a 3D reality through the perception of the relative distance of objects made by partial blocking and hiding.


“Hitting the Wall” captured by Mark Feliciano


II. RELATIVE SIZE

Our brain is very complex but gets fooled easily. We have a notion that when an object becomes more distant, it appears smaller than the one which is closer to the viewer.

In reality our brain has encodings of “natural” size of different objects like trees, cars, people and animals. So when we see a person twice as big as building, we cannot rationally conclude that the person is actually twice as big in reality. Our brain tells us that the building is farther away for a person. Alternatively when we carefully place different objects at different distances but giving an illusion that they are in the same plane produces funny images.

So in a nutshell, our brain makes an evaluation of the sizes based on “known” objects in relationship with other objects in the photo. Thus a distance is “imagined” in the brain and creates the “depth” in the photo that the photographer is looking for. This is also called “scaling” which helps the viewer to determine the actual size or relative size of the objects in the picture. 

III. LINEAR, RECTILINEAR AND VANISHING POINT

“downtown” captured by rjnic


This when expanded to the rectangular objects, you find that some of the lens (fish-eye and panoramic) produces objects at the sides much smaller than it actually is and the objects at the center much larger that it’s actual size. Geometrically all straight horizontal lines at the lens axis level are represented as straight lines, and all other straight horizontal lines either above or below the lens axis level are reproduced as curved lines. But with “rectilinear perspective” the straight lines in the subject are reproduced straight in the picture (normal lenses are rectilinear lenses) which is way we see things normally.

It is noteworthy to mention that any photo is subject to “perspective projection distortion” which can be controlled and corrected with various methods that I will describe in Part II of this series.

The fish-eye and panoramic lenses produces “false” perspectives and are used only to produce “special” effects on purpose (more on this in Part II: Playing with perspective).

So back to linear perspective. Lines that are parallel to each other when seen at a great distance gives us the sensation of meeting (at vanishing points) for example in rail tracks. This “converging parallel lines” illusion can be used to show “distance” or depth in the photo.


IV. LACK OF SHARPNESS, COLOUR QUALITY OR CONTRAST

“dwntn blue” captured by Mike Regan
We are accustomed to our eyes not able to figure out objects in the distant far off (due to lowering of contrast or scattering of light or both). We can use this information to “create” the effect of lack of sharpness/contrast by controlling the depth of field. Now controlling depth of field is totally different subject area in Photography and I do not want to mix it with the current discussion of perspective control. But just for the sake of completeness, I can give you a quick hint: just focus your lens slightly shorter than infinity so that the farthest object looks blurred thus giving the viewers a sense of distance.

Also atmospheric conditions like haze/fog/dust can cause loss of image sharpness at a distant. Since the effect of this “haze” (scattering of light due to particles in the air) is proportional to the distance of the objects from the lens, we can use this information as well in composing the shot.

Of course, there are various different factors that contribute to varying atmospheric conditions but the result effect of reduction of contrast, brightness and saturation can make our eyes believe that we are looking at something really distant compared to the objects that are clear, sharp and vibrant color.

So next time when you are trying to compose a photo, before pressing the shutter, think again. Are you able to successfully illustrate the “3D-factor” through any (or all) of the above mentioned “illusion” methods. In Part II of this article, I will explain the myth on perspective, zooming/framing and distortion corrections.


Chris Kotsiopoulos

For the 'Great Photographer' presentation I teamed up with Nyall and Jo to create a presentation on Greek photographer 'Chris Kotsiopoulos'. 

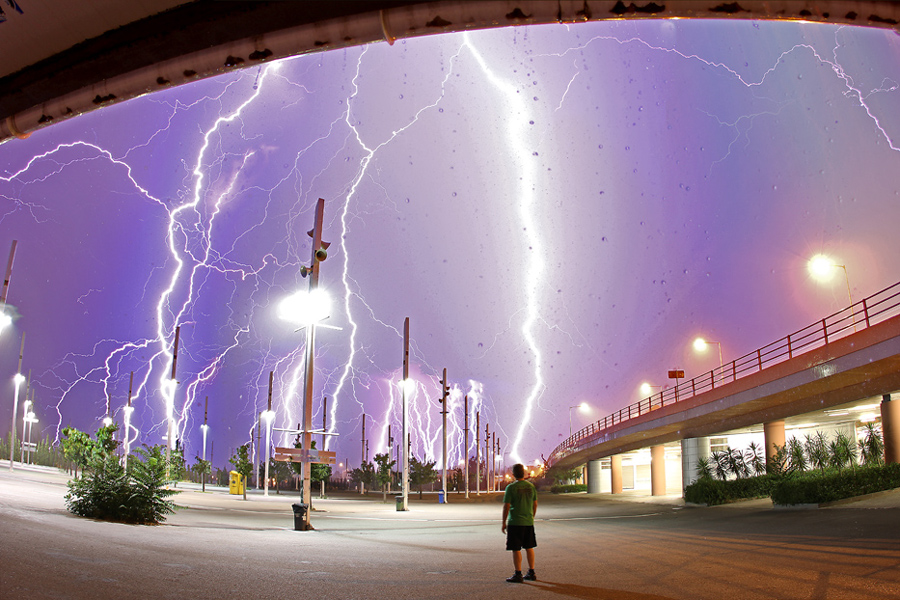
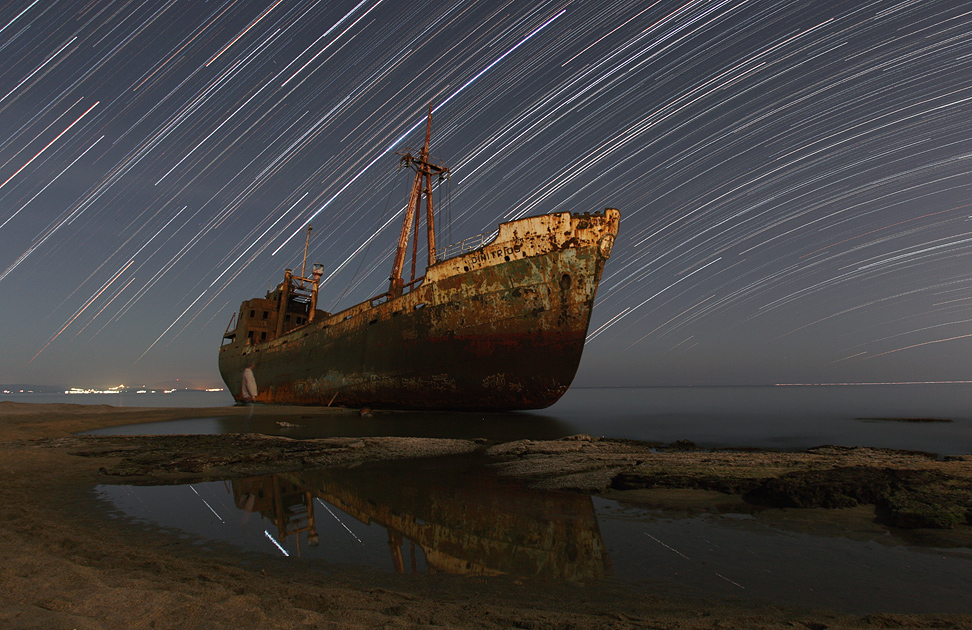
His photography work generally focuses on but is not limited to skyscapes, capturing things such as star trails, rainbows, lightning, sunsets and more.

For the presentation we picked three photos each to talk about.

This one is my favourite because of how difficult this was to achieve. Chris has actually gone to the effort of explaining his process for this image here along with all the essential supplies such a large 12v battery for shooting over long periods of time.


All photos taken from Chris's website: http://www.greeksky.gr/

The presentation we did can be seen here.

Collected Panoramas


Below are a few images I selected from a Mashable collection of 'Panorama fails' including human subjects. The people in the pictures are distorted in strange ways due to them moving while the images were being captured for the panorama. Some of these 'fails' actually create quite interesting effects.


http://mashable.com/2013/11/18/panoramic-fails-humans/#_

I don't think any of these effects will be applicable to this module but they could certainly be used to create some interesting images.